HOME Information DrayTek Blog VPN EasyVPN
EasyVPN
Vigor Router supports various VPN protocols, including IPsec, WireGuard, and OpenVPN. With so many protocols and configuration options, general users may encounter difficulties in choosing the right one, face challenges during setup, or fail to establish a VPN connection due to environmental factors. To reduce these issues, Vigor Router has developed a new EasyVPN feature. With EasyVPN, users no longer need to generate WireGuard keys, import OpenVPN configuration files, or upload certificates. Instead, VPN can be successfully established by simply entering the username and password or getting the OTP code by email. Additionally, if a VPN connection cannot be established for any reason, the EasyVPN Client will automatically switch to the next available protocol and retry the connection.
Supported model and firmware version:
• Vigor2136, C510, C410 fw 5.3.1
• Vigor3912, 3910, 2962 fw 4.4.5
• Windows Smart VPN Client v5.7.0
• Android Smart VPN App v1.6.0
• iOS Smart VPN App v1.9.6
• macOS Smart VPN App v1.8.0
• Linux Easy VPN Client v1.0.0
Supported Easy VPN protocols in each OS:
|
VPN Type
|
Windows
|
iOS
|
macOS
|
Android
|
Linux
|
|---|---|---|---|---|---|
|
IPsec
IKEv1
PSK
|
Yes | Yes | |||
|
IPsec
IKEv1
XAuth
|
Yes | Yes | |||
|
IPsec
IKEv2
PSK
|
Yes | ||||
|
IPsec
IKEv2
EAP
|
Yes | Yes | Yes | Yes | |
| WireGuard | Yes | Yes | Yes | Yes | |
| OpenVPN | Yes | Yes | Yes |
DrayOS
Vigor Router Setup
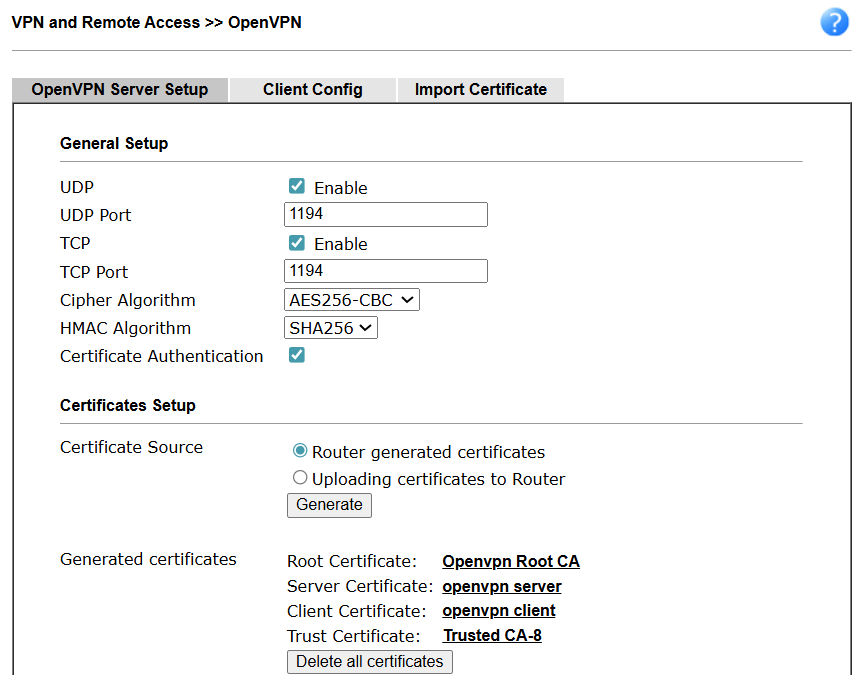
1. Enable VPN services and configure the corresponding settings.
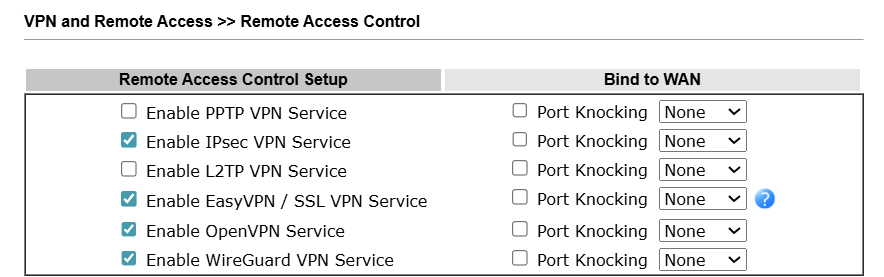
• Go to VPN and Remote Access >> Remote Access Control, select Enable EasyVPN and the VPN services desired to use.
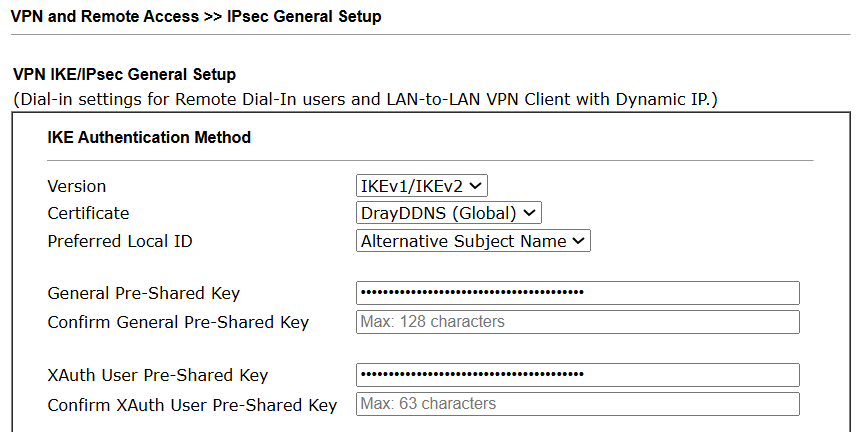
• IPsec: Select the Certificate for the IPsec Dial-In connection.
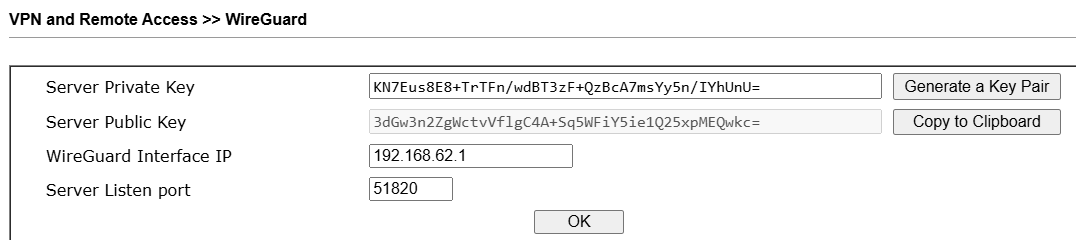
• WireGuard: Generate the Key Pairs for the WireGuard VPN server.
• OpenVPN: Enable the Open VPN function and Generate the Router Certificates for OpenVPN Dial-In connection.
2. Create a Remote Dial-in User Profile.
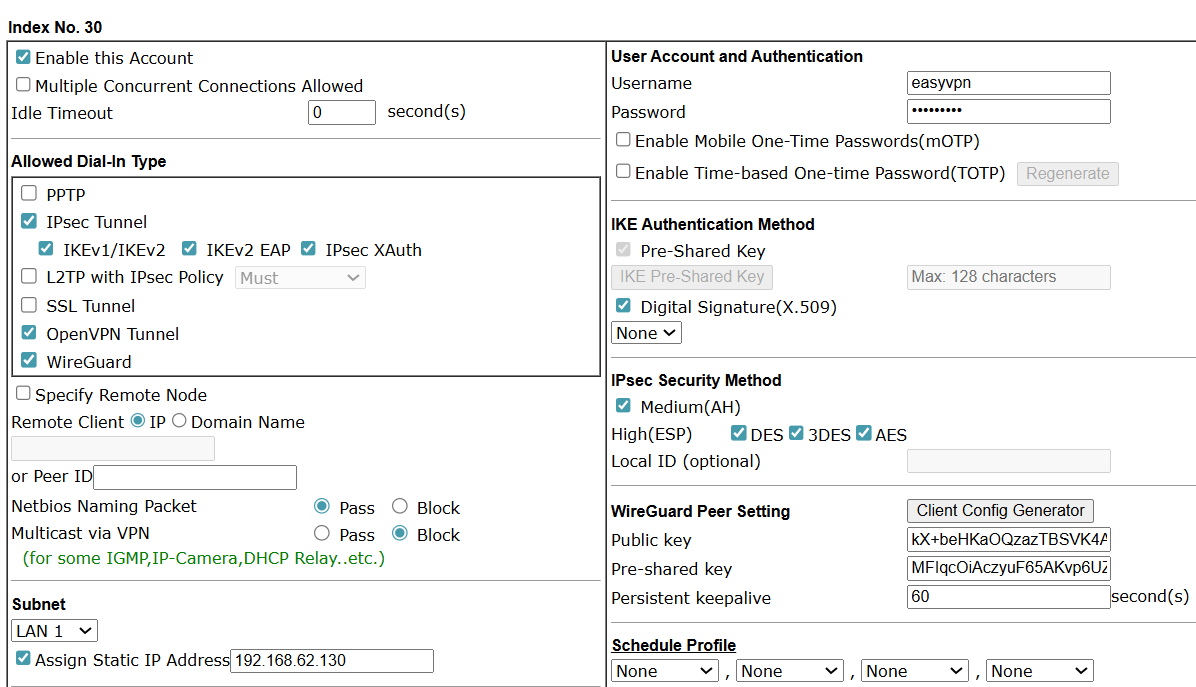
Go to VPN and Remote Access >> Remote Dial-in User, then click on an available index number.
In the profile settings:
• Check Enable this account
• Enter Username and Password
• Select the desired VPN protocols in the Allowed Dial-In Type area
• When WireGuard VPN is selected, Check the Assign Static IP address option and enter an IP address and click Client Config Generator to generate the Key Pairs for the WireGuard VPN client.
• Click OK to save the settings.
3. Enable EasyVPN service.
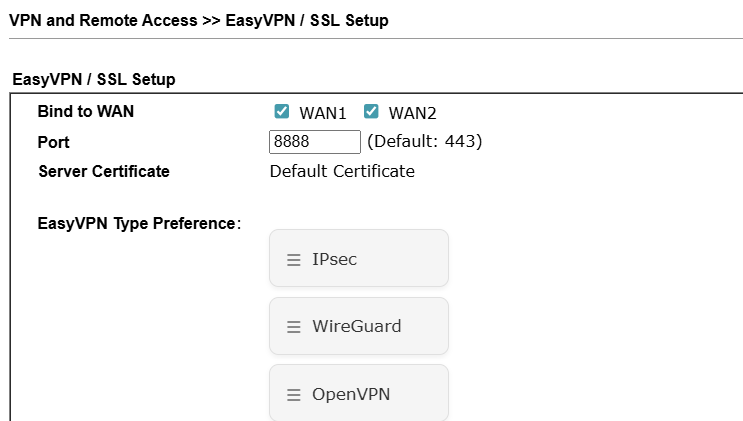
Go to VPN and Remote Access >> EasyVPN and SSL Setup.
• Select the WAN for EasyVPN service in Bind to WAN
• Specify the EasyVPN Service Port. EasyVPN can use the customized port or uses the same port as the HTTPS Management port for the EasyVPN service. Note that HTTPS Management from the WAN must be enabled to allow the EasyVPN client to communicate with the EasyVPN server.
• The EasyVPN Type Preference feature allows users to customize the priority of Dial-In VPN connections. By default, the sequence is arranged based on VPN performance: IPsec > WireGuard VPN > OpenVPN. To adjust the order, simply drag and rearrange the items in the provided interface.
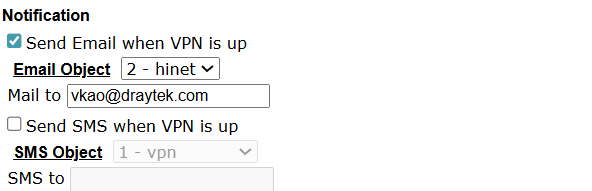
4. To use Email OTP as the authentication method, create a Mail Service Object on the router by navigating to Objects Setting >> SMS/ Mail Service Object. Then specify the user’s email in the Notification Setting of the VPN Remote Dial-in User profile.
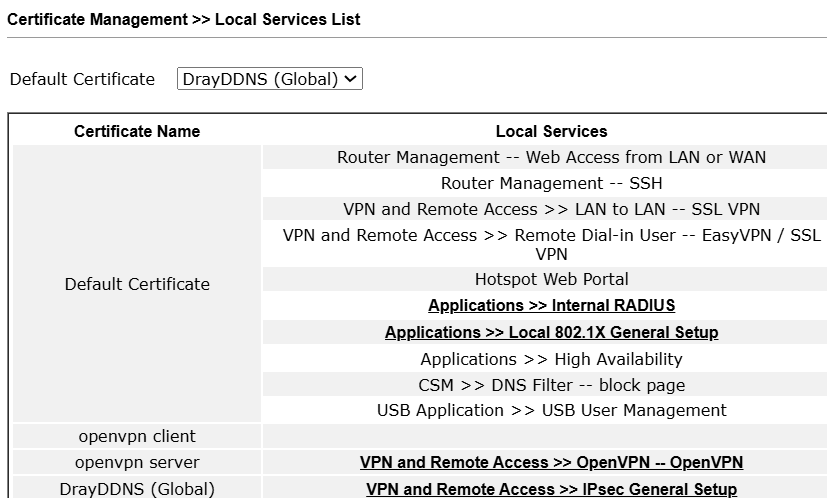
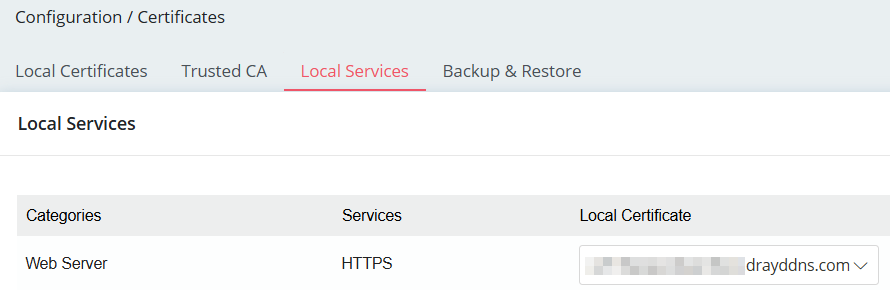
5. To use EasyVPN on an iOS device, it is necessary to select a valid certificate, such as a Let’s Encrypt certificate, for the HTTPS service on the Vigor Router.
Windows Smart VPN Client Setup
Authentication Type: Username and Password
0. Before using EasyVPN, please ensure that the native OpenVPN and WireGuard software is already installed on your Windows system. Alternatively, it is recommended to use SmartVPN Client version 5.7.1 or later, which includes the installation packages for both OpenVPN and WireGuard during setup.
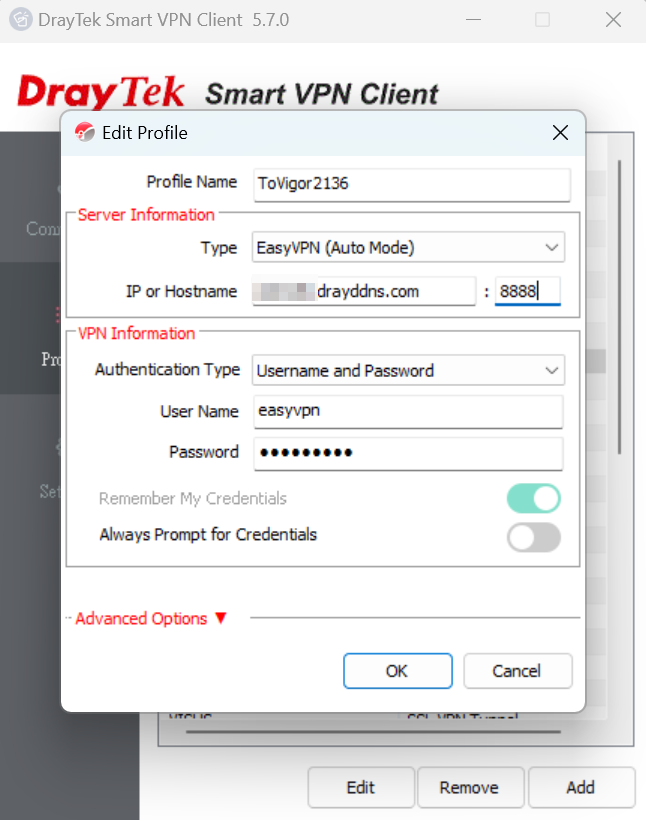
1. Add a VPN profile, select EasyVPN (Auto mode) as the VPN type, enter the VPN server’s IP or domain name, the username and the password, then click OK to save the settings.
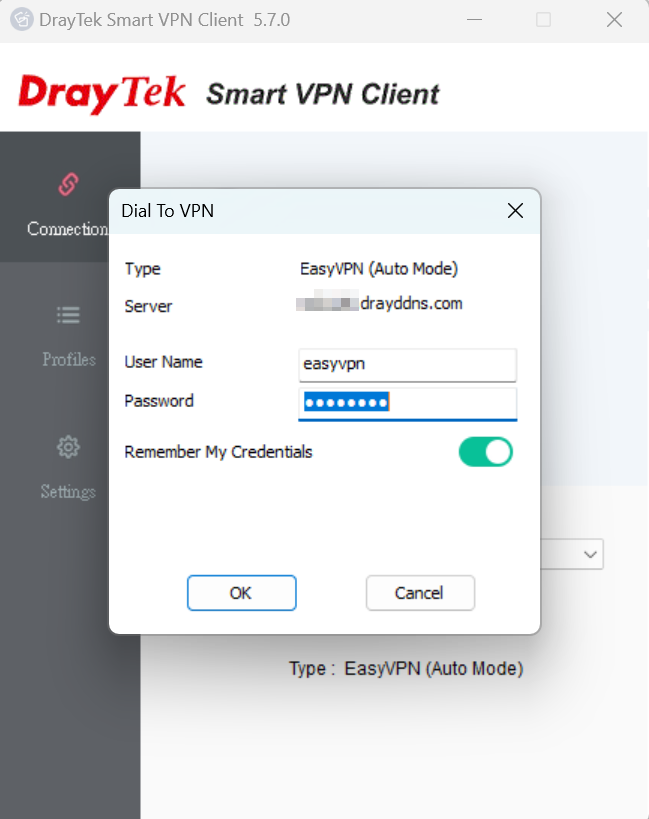
2. Switch on Connect. A Dial To VPN prompt will appear, enter the password to initiate the VPN connection.
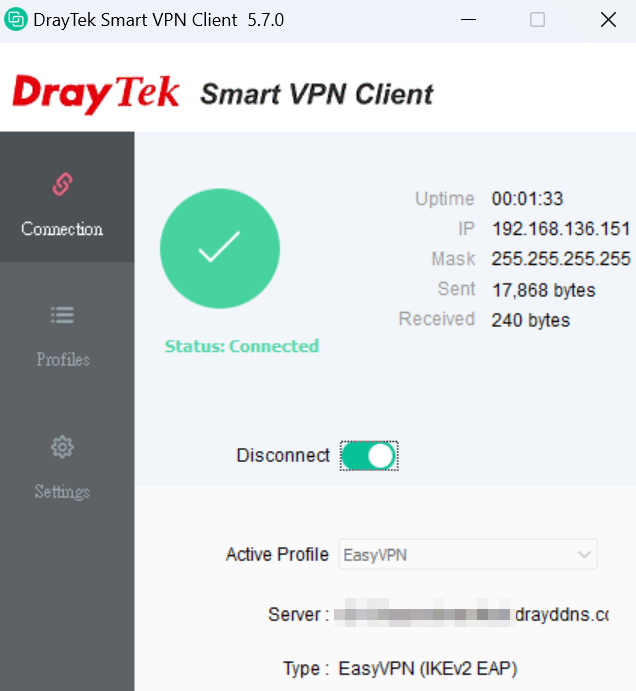
3. EasyVPN is up.
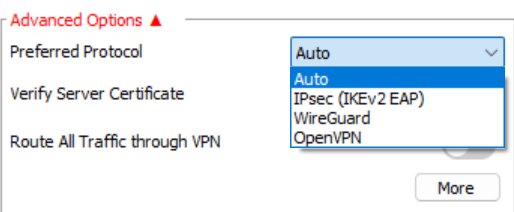
4. The VPN client includes a Preferred Protocol option, allowing users to specify their preferred VPN types. For instance, if a user is unable to connect via IPsec VPN but can establish a connection using WireGuard VPN, we recommend selecting WireGuard as the Preferred Protocol in the VPN profile within the Smart VPN Client. This will ensure that WireGuard is prioritized for connection attempts in the future.
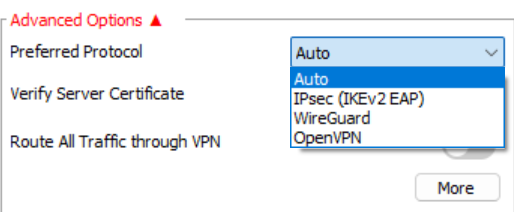
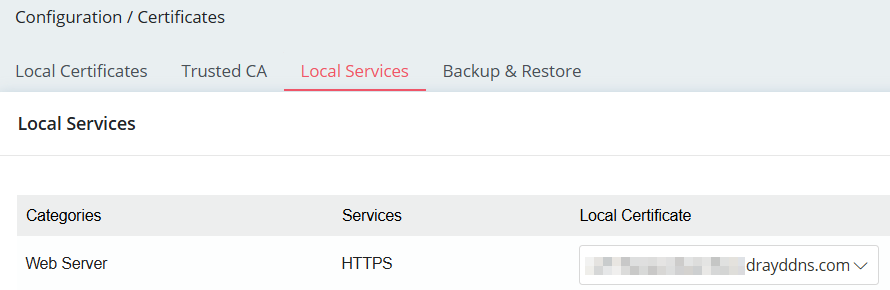
Verify Server Certificate option determines whether the EasyVPN server's certificate will be verified. The EasyVPN server uses the same certificate as the HTTPS server. When enabling this option, the EasyVPN server needs to have a valid certificate installed, such as Let’s Encrypt Certificate for its Web/HTTPS server.
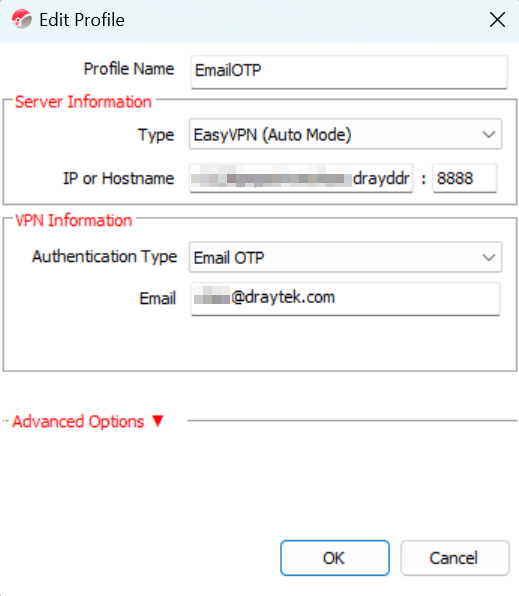
Authentication Type: Email OTP
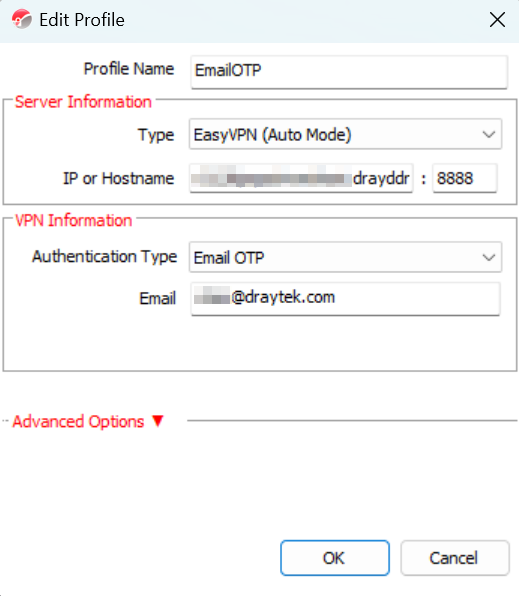
1. Add a VPN profile, select EasyVPN (Auto mode) as the VPN type, enter the VPN server’s IP or domain name, select Email OTP as the Authentication Type, enter the user’s email address, then click OK to save the settings.
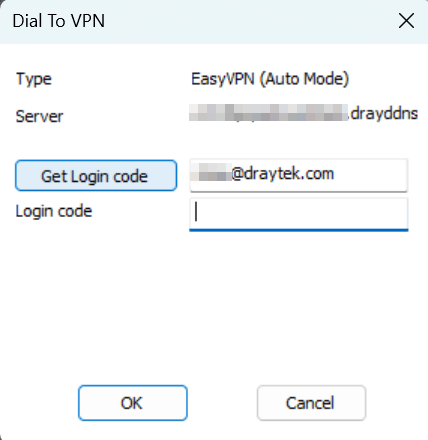
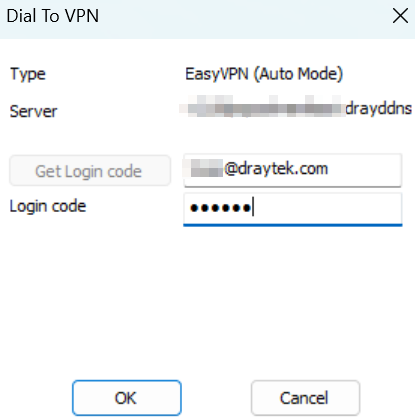
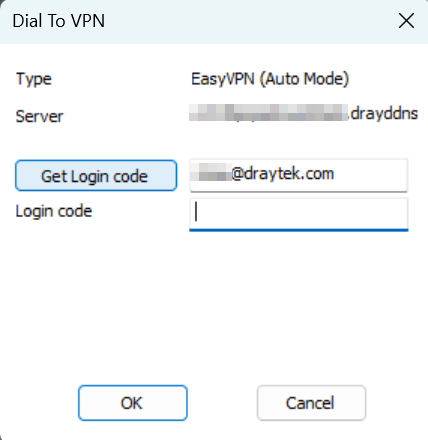
2. Switch on Connect. A Dial To VPN prompt will appear, click the Get Login code button. The login code will be sent from Vigor2136 to the user’s email.
3. Check the mailbox to get the code from the email.
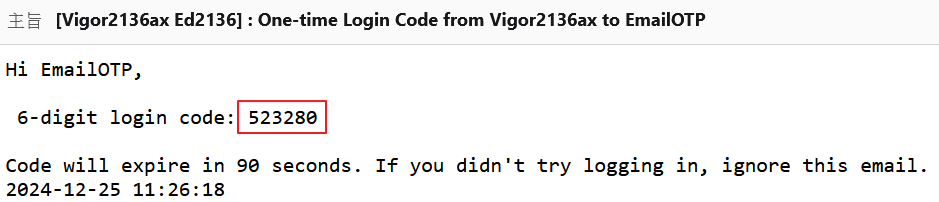
4. Enter the code in the Dial To VPN prompt window, then click OK.
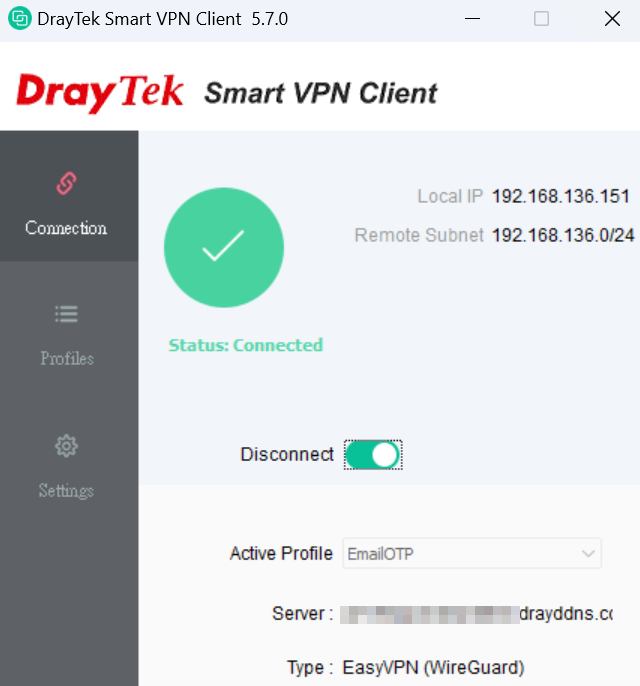
5. EasyVPN is up.
Android SmartVPN App Setup
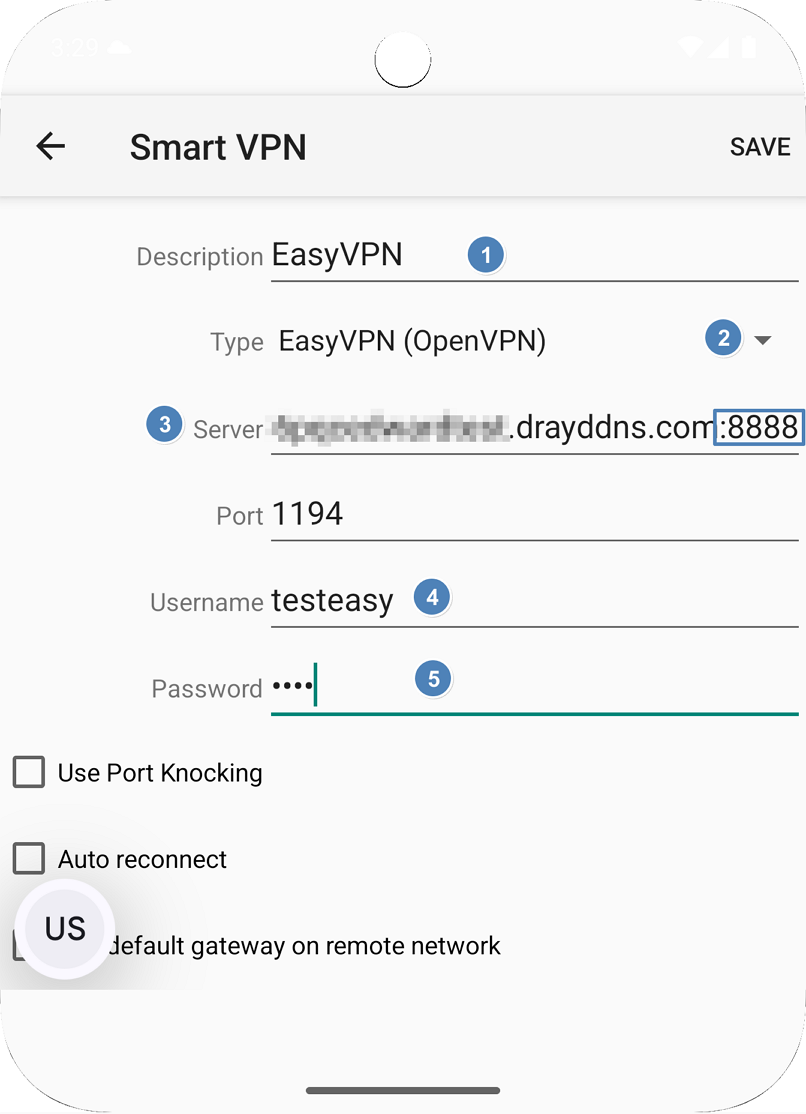
1. Add a VPN profile.
• Enter a name for the Profile Description
• Select OpenVPN as the VPN type
• Enter the VPN server’s IP or domain name and appending : if the EasyVPN server is using a customized port.
• Enter the username and the password
• Click Save to save the settings.
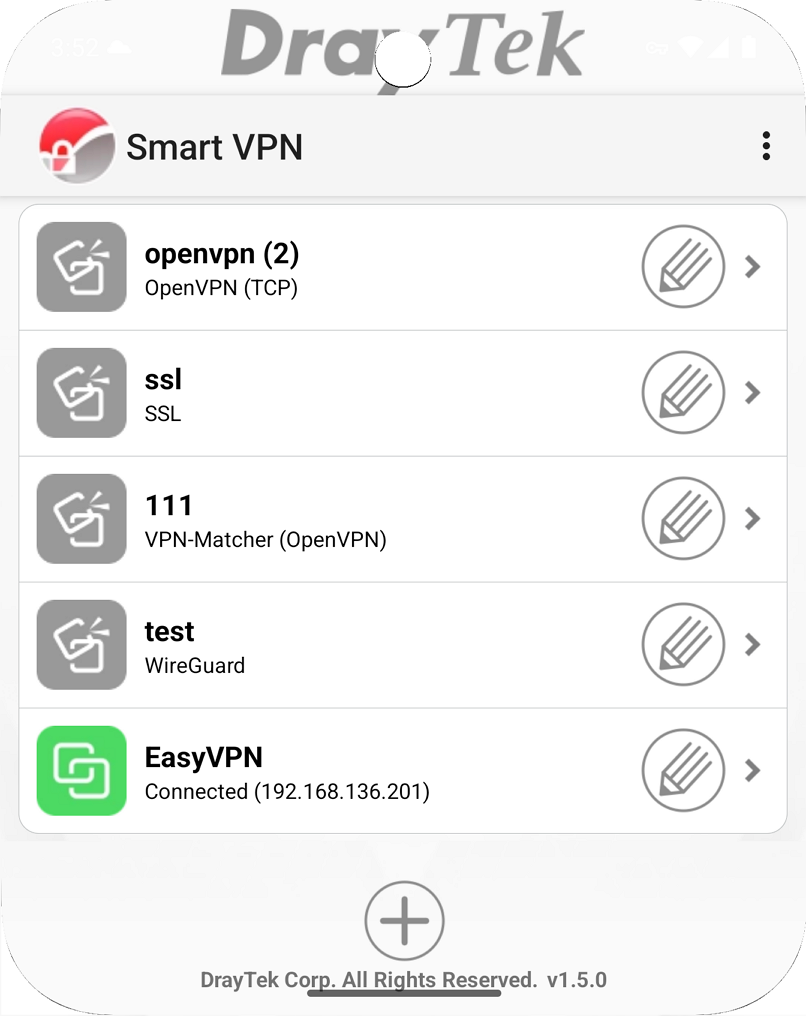
2. Switch On Connect. EasyVPN connection is successfully connected.
iOS Smart VPN Client Setup
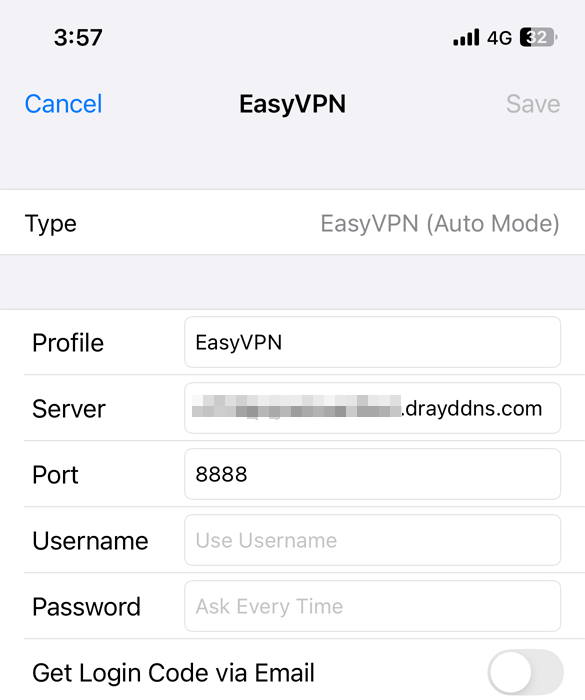
1. Run SmartVPN app and add a profile as follows:
• Select EasyVPN (Auto Mode) as Type
• Give it a Profile Name
• Enter the VPN server’s Domain Name, which applied with a valid certificate for HTTPS service.
• Enter the EasyVPN port configured on the VPN server
• Enter the Username and Password.
• Save the profile.
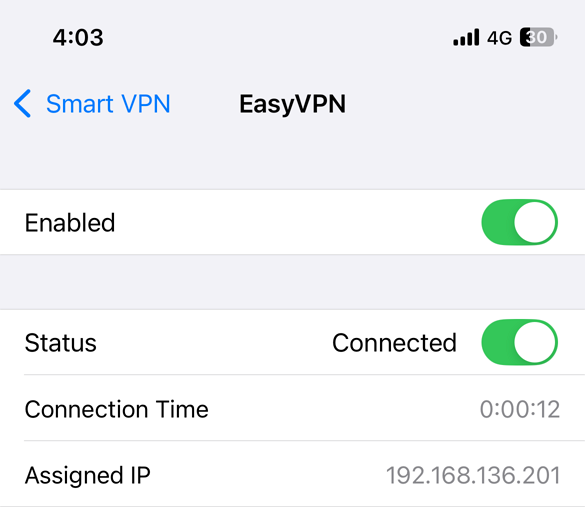
2. Switch on the profile, then switch on Connect to start the VPN connection. EasyVPN connection is successfully connected.
macOS Smart VPN Client Setup
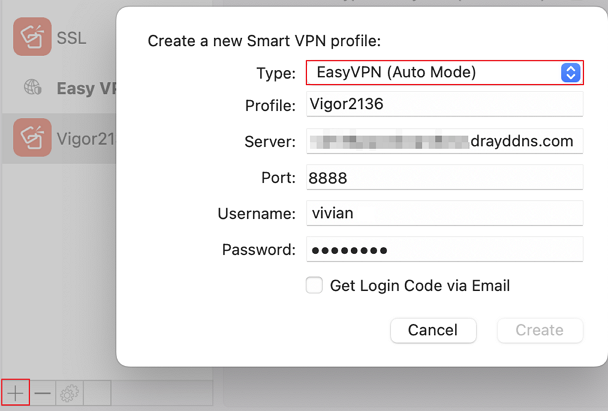
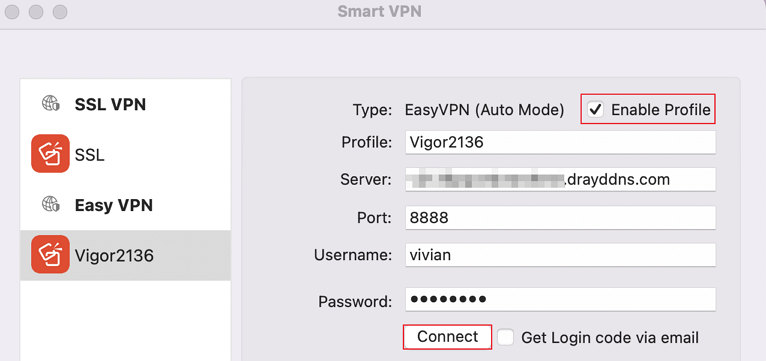
1. Run SmartVPN app and add a profile as follows:
• Select EasyVPN (Auto Mode) as Type
• Give it a Profile Name
• Enter the VPN server’s Domain Name, which applied with a valid certificate for HTTPS service.
• Enter the EasyVPN port configured on the VPN server
• Enter the Username and Password.
• Save the profile.
2. Tick Enable Profile to enable this profile, and click Connect to dial up the EasyVPN connection.
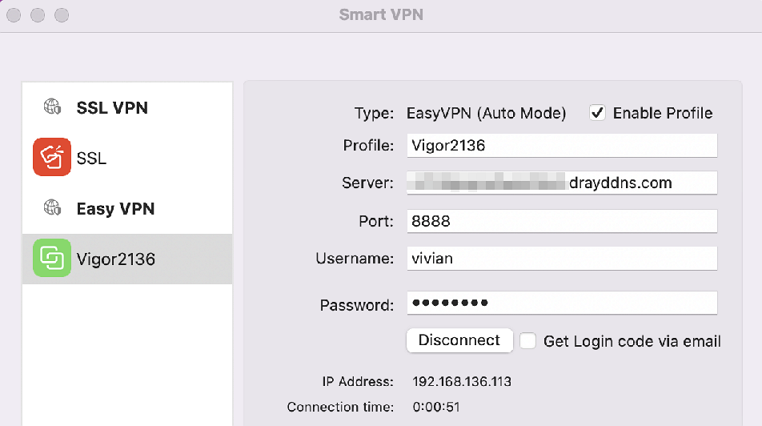
3. EasyVPN connection is successfully connected.
DrayOS 5
Vigor Router Setup
1. Enable VPN services and configure the corresponding settings.
• IPsec: Select the Certificate for the IPsec Dial-In connection. It is recommended to use a Let's Encrypt Certificate.
• WireGuard: Generate the Key Pairs for the WireGuard Dial In connection.
• OpenVPN: Generate and Select the Router Certificates for OpenVPN Dial-In connection.
2. Create a Teleworker VPN User Profile.
Navigate to VPN > Teleworker VPN, click Add, and enter the Username and Password.
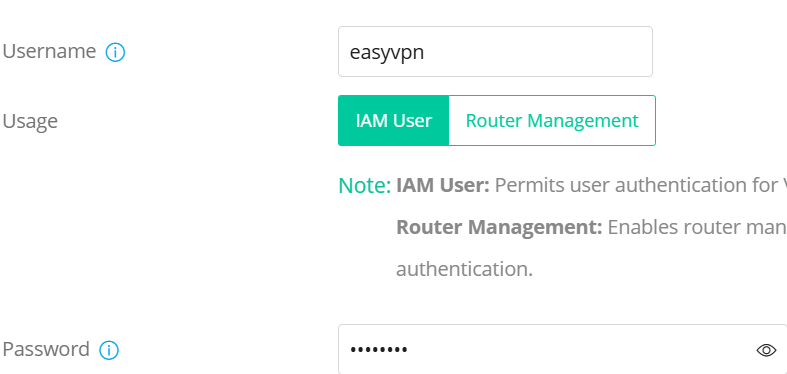
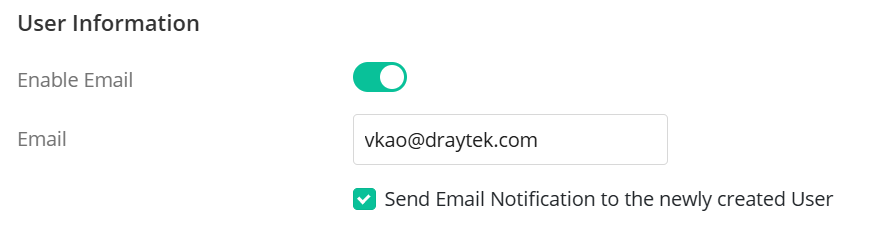
In the User Information section, switch on the Enable Email option and enter the user's email address. This will be used when using the Email OTP method for authentication.
In the Teleworker VPN tab,
• Switch On Enable Teleworker VPN
• Enter 0 (Seconds) for the Idle Timeout
• Select the VPN Schedule
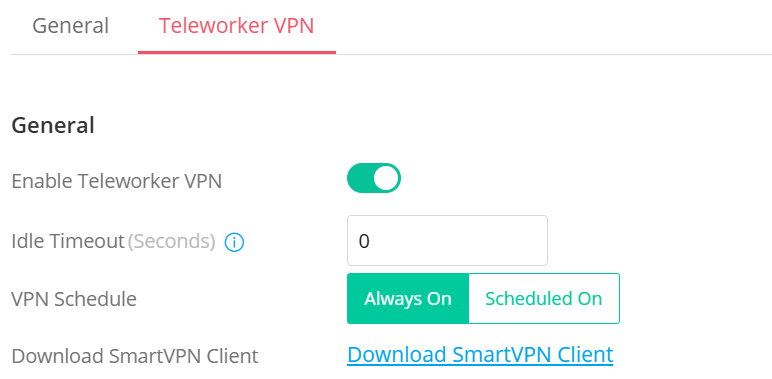
• Under Allowed VPN Protocols, enable IPsec, OpenVPN and WireGuard. It is recommended to deselect IKEv1/v2 since EasyVPN Teleworker could not use this option to dial in while using a dynamic IP address.
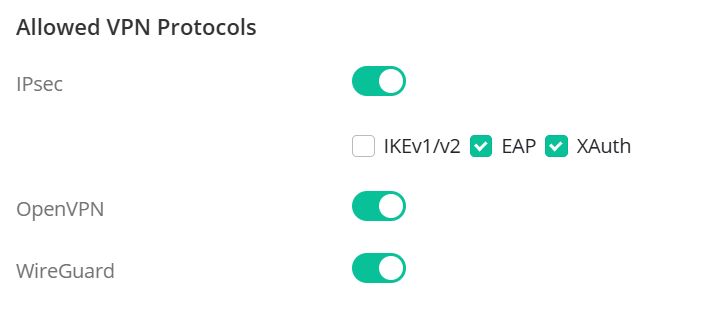
• Click Generate Key Pair and Generate PSK to create the WireGuard settings for the user.
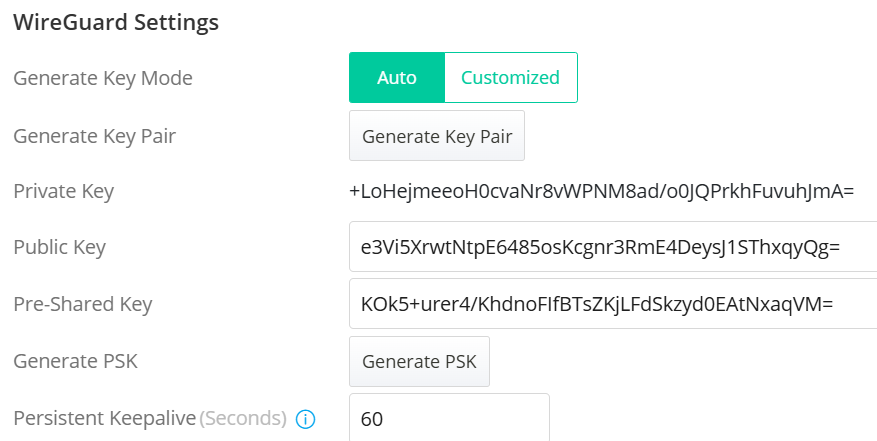
• In Local IP Assignment, choose a LAN subnet for Assign IP from the LAN DHCP or configure a static IP for Static IP. Static IP must be used if WireGuard Protocol is enabled in the profile.
Please note that the Static IP option is not available when WireGuard is selected in the current firmware version. To assign a fixed IP to the VPN user, first deselect WireGuard and choose Static IP. Then, reselect WireGuard.
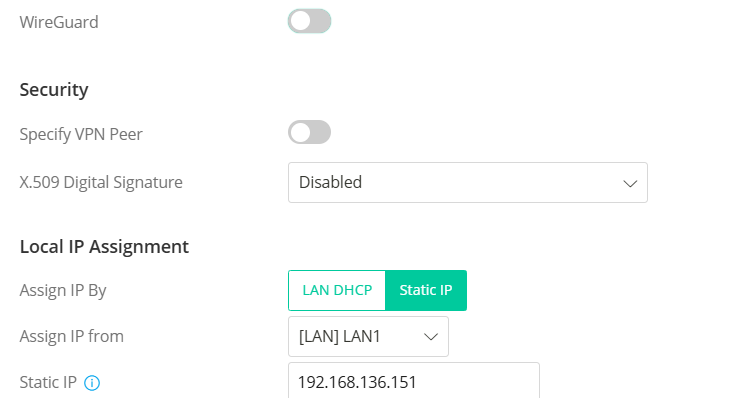
• Click Apply to save the settings.
3. Enable EasyVPN service.
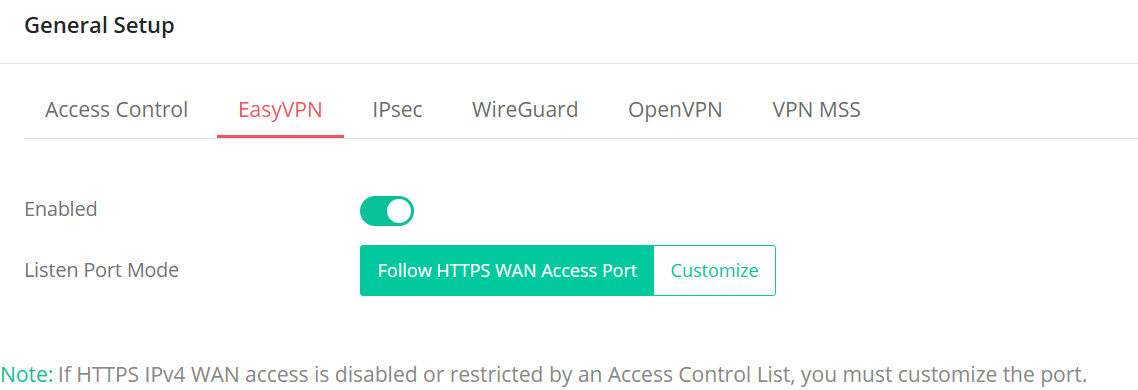
Navigate to VPN / General Setup/ EasyVPN and Enable the EasyVPN service.
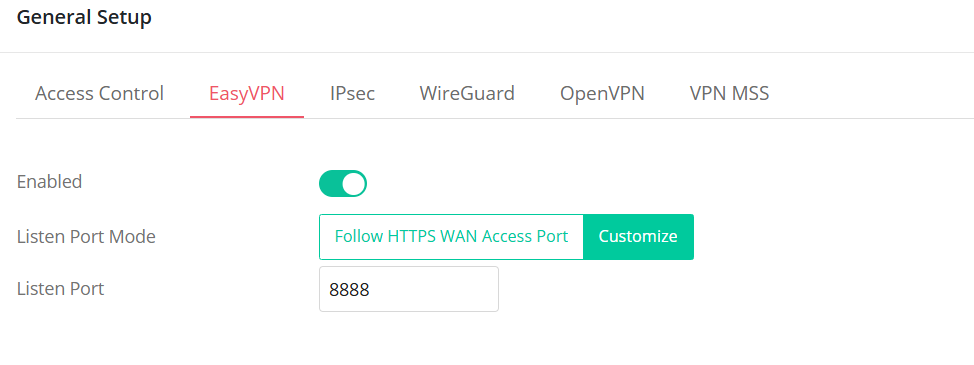
The Listen Port mode allows users to configure the ports that the EasyVPN service listens to.
• Follow HTTPS WAN Access Port: This option uses the same port as the HTTPS Management port for the EasyVPN service. Note that HTTPS Management from the WAN must be enabled to allow the EasyVPN client to communicate with the EasyVPN server.
• Customize: This option allows users to manually configure the port for the EasyVPN service.
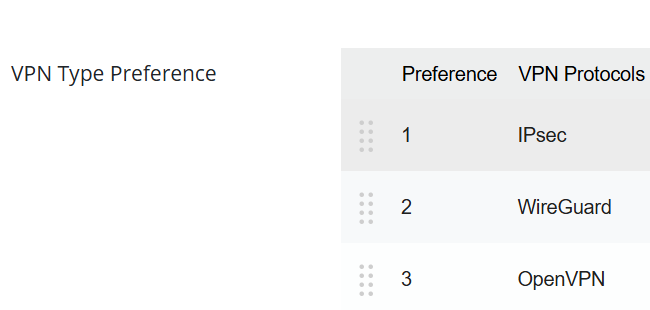
• The VPN Type Preference feature allows users to customize the priority of Dial-In VPN connections. By default, the sequence is arranged based on VPN performance: IPsec > WireGuard VPN > OpenVPN. To adjust the order, simply drag and rearrange the items in the provided interface.
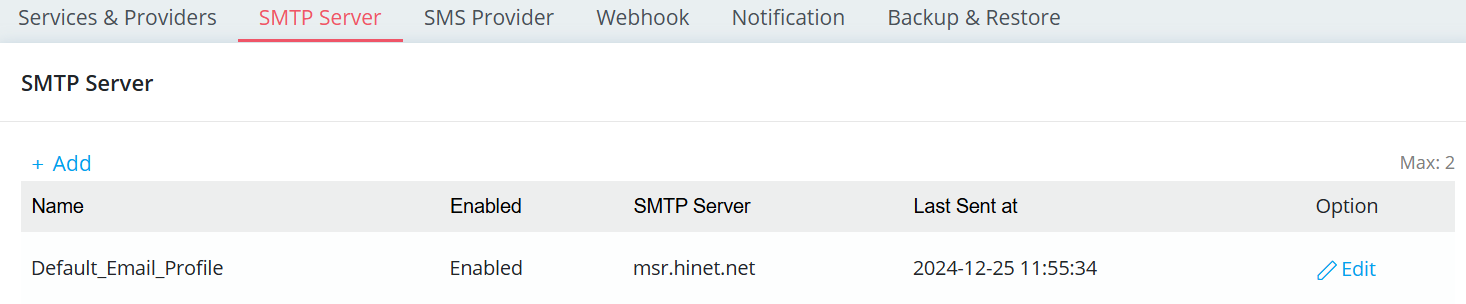
4. To use Email OTP as the authentication method, create an Email profile on the router by navigating to Configuration > Notification Services > SMTP Server. Refer to the SMTP setup article for more details.
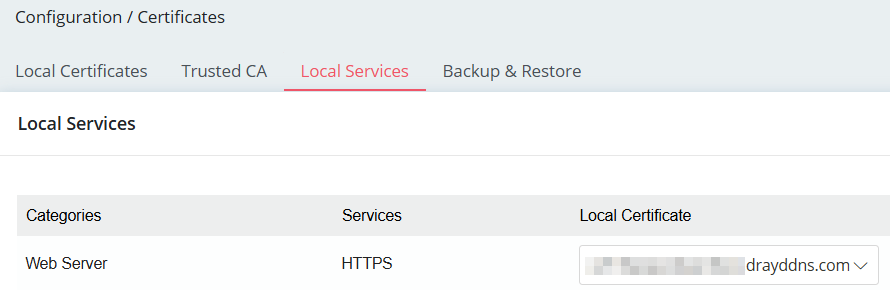
5. To use EasyVPN on an iOS device, it is necessary to select a valid certificate, such as a Let’s Encrypt certificate, for the HTTPS service on the Vigor Router.
Windows Smart VPN Client Setup
Authentication Type: Username and Password
0. Before using EasyVPN, please ensure that the native OpenVPN and WireGuard software is already installed on your Windows system. Alternatively, it is recommended to use SmartVPN Client version 5.7.1 or later, which includes the installation packages for both OpenVPN and WireGuard during setup.
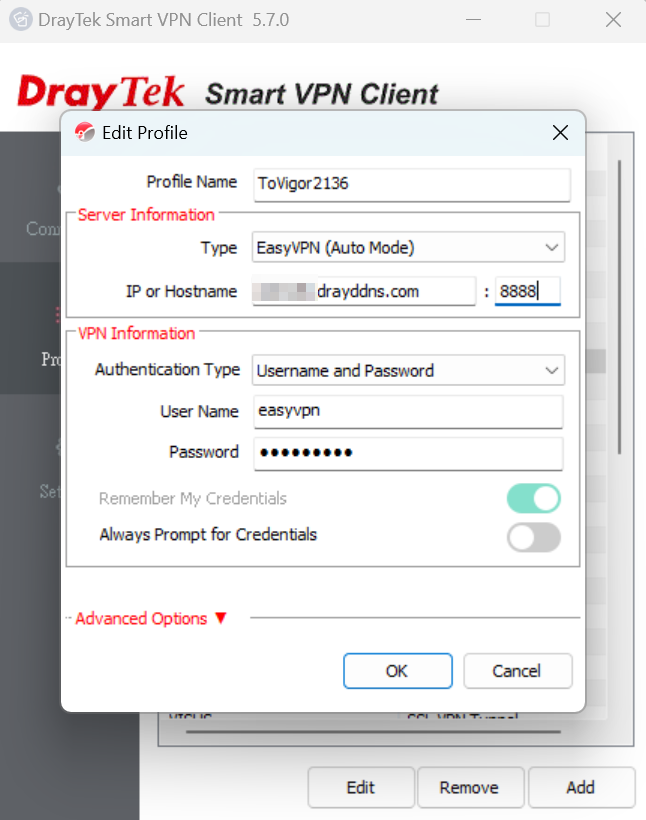
1. Add a VPN profile, select EasyVPN (Auto mode) as the VPN type, enter the VPN server’s IP or domain name, the username and the password, then click OK to save the settings.
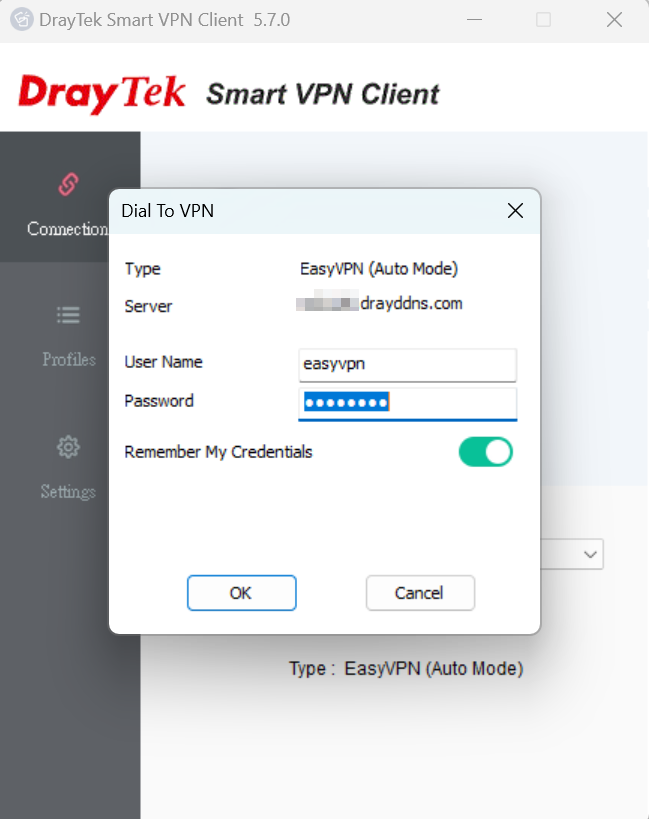
2. Switch on Connect. A Dial To VPN prompt will appear, enter the password to initiate the VPN connection.
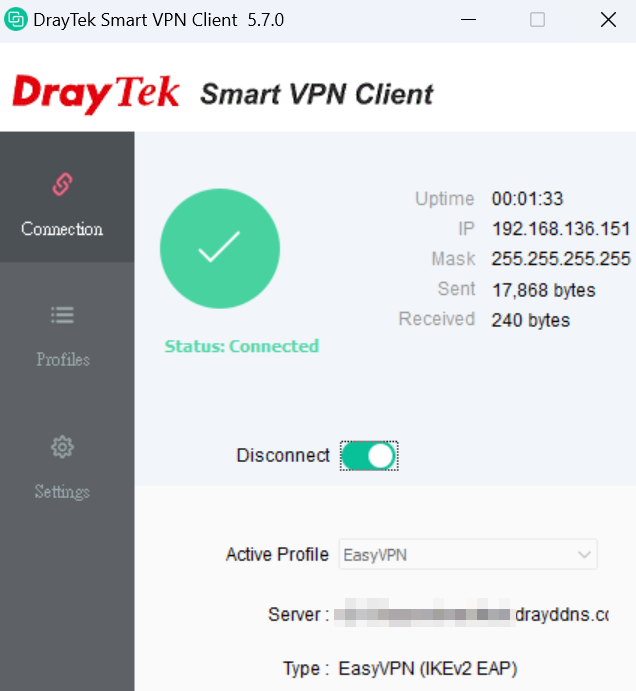
3. EasyVPN is up.
4. The VPN client includes a Preferred Protocol option, allowing users to specify their preferred VPN types. For instance, if a user is unable to connect via IPsec VPN but can establish a connection using WireGuard VPN, we recommend selecting WireGuard as the Preferred Protocol in the VPN profile within the Smart VPN Client. This will ensure that WireGuard is prioritized for connection attempts in the future.
Verify Server Certificate option determines whether the EasyVPN server's certificate will be verified. The EasyVPN server uses the same certificate as the HTTPS server. When enabling this option, the EasyVPN server needs to have a valid certificate installed, such as Let’s Encrypt Certificate for its Web/HTTPS server.
Authentication Type: Email OTP
1. Add a VPN profile, select EasyVPN (Auto mode) as the VPN type, enter the VPN server’s IP or domain name, select Email OTP as the Authentication Type, enter the user’s email address, then click OK to save the settings.
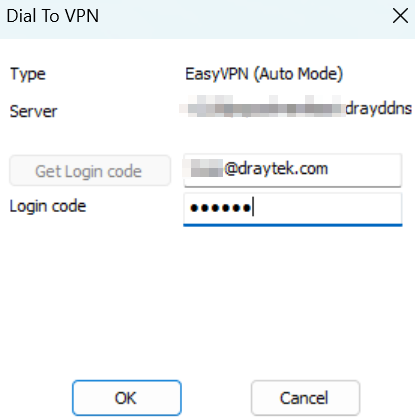
2. Switch on Connect. A Dial To VPN prompt will appear, click the Get Login code button. The login code will be sent from Vigor2136 to the user’s email.
3. Check the mailbox to get the code from the email.
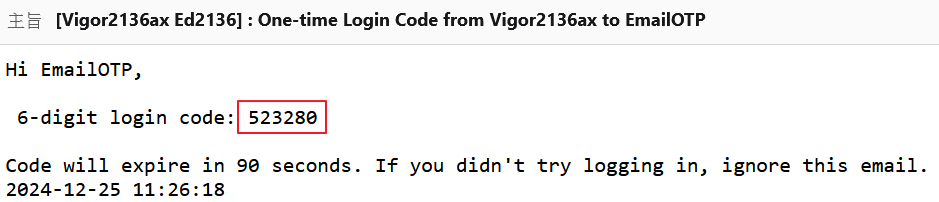
4. Enter the code in the Dial To VPN prompt window, then click OK.
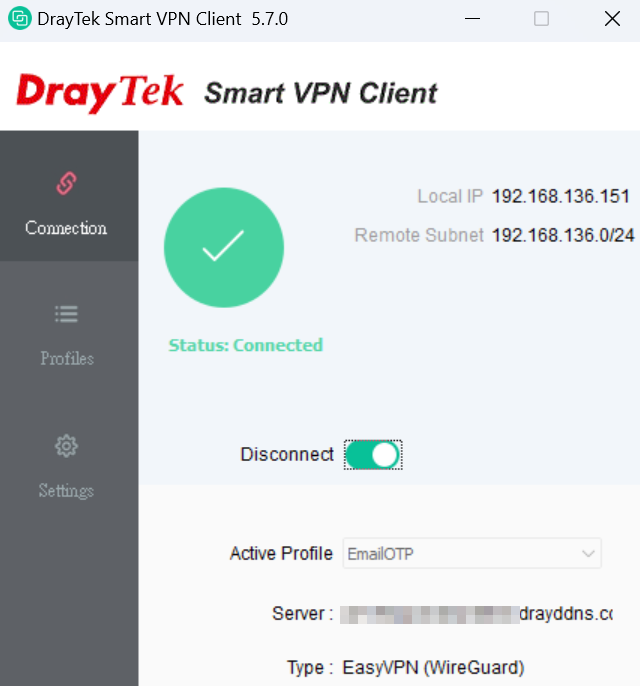
5. EasyVPN is up.
Android SmartVPN App Setup
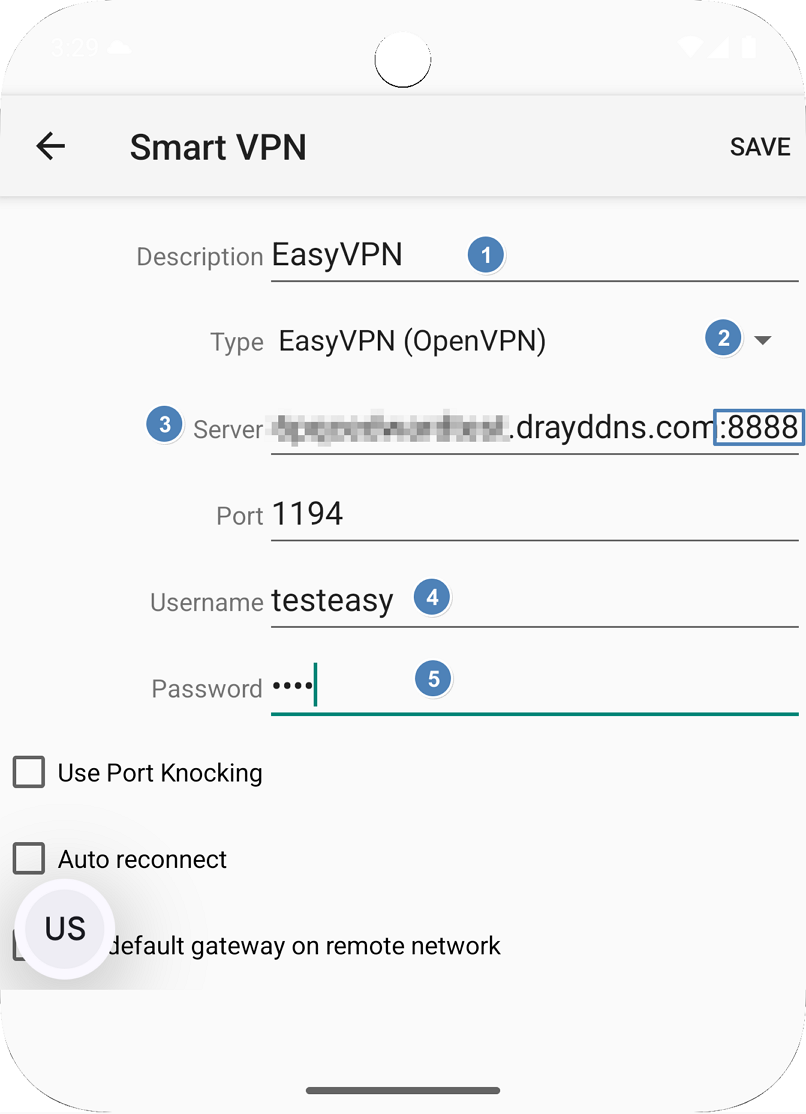
1. Add a VPN profile.
• Enter a name for the Profile Description
• Select OpenVPN as the VPN type
• Enter the VPN server’s IP or domain name and appending : if the EasyVPN server is using a customized port.
• Enter the username and the password
• Click Save to save the settings.
2. Switch On Connect. EasyVPN connection is successfully connected.
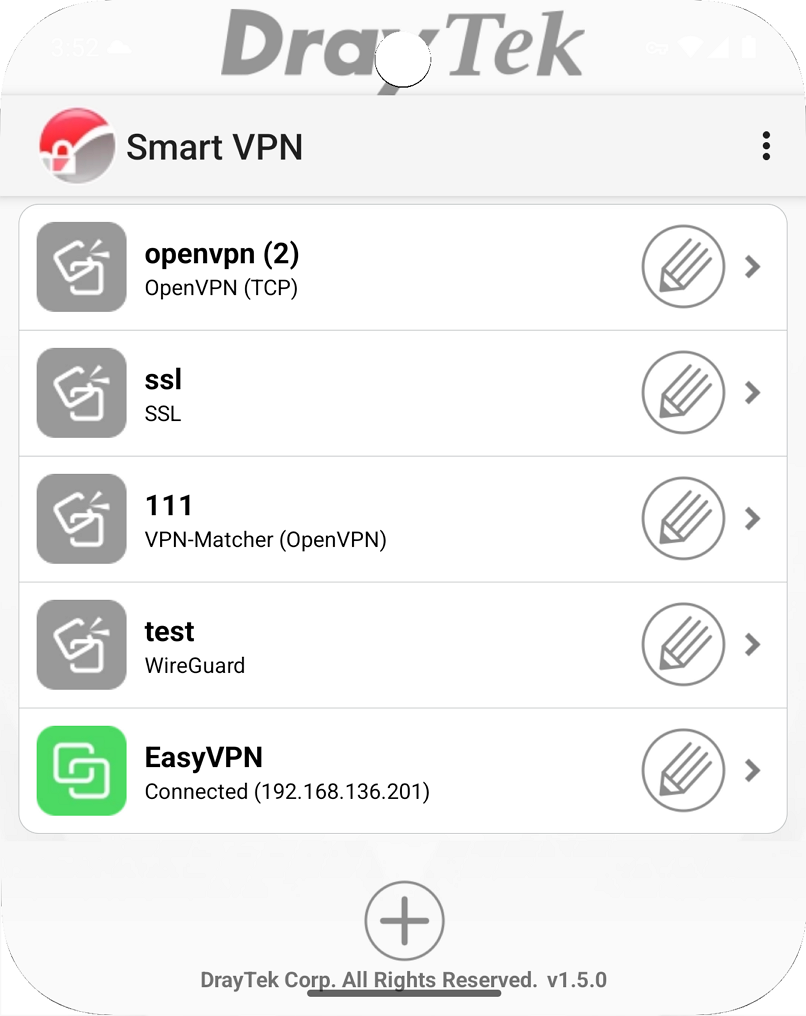
iOS Smart VPN Client Setup
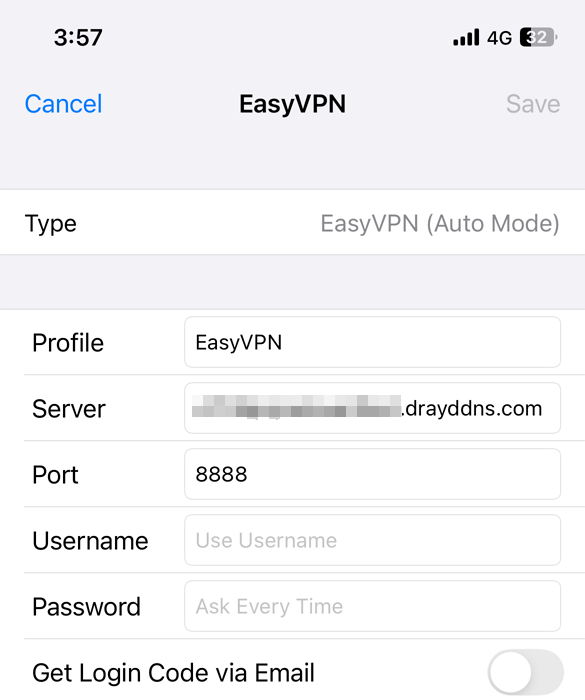
1. Run SmartVPN app and add a profile as follows:
• Select EasyVPN (Auto Mode) as Type
• Give it a Profile Name
• Enter the VPN server’s Domain Name, which applied with a valid certificate for HTTPS service.
• Enter the EasyVPN port configured on the VPN server
• Enter the Username and Password.
• Save the profile.
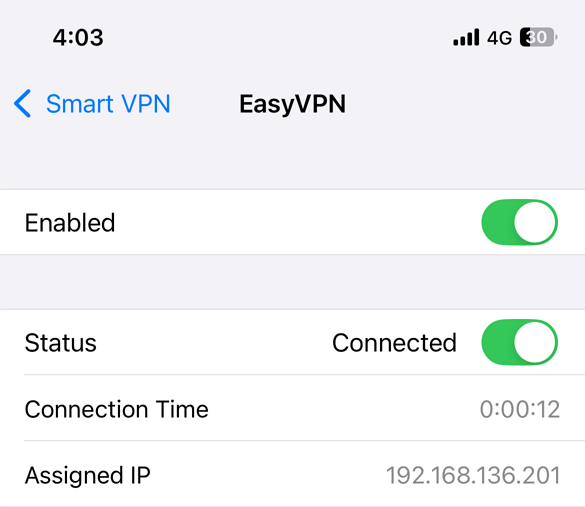
2. Switch on the profile, then switch on Connect to start the VPN connection. EasyVPN connection is successfully connected.
macOS Smart VPN Client Setup
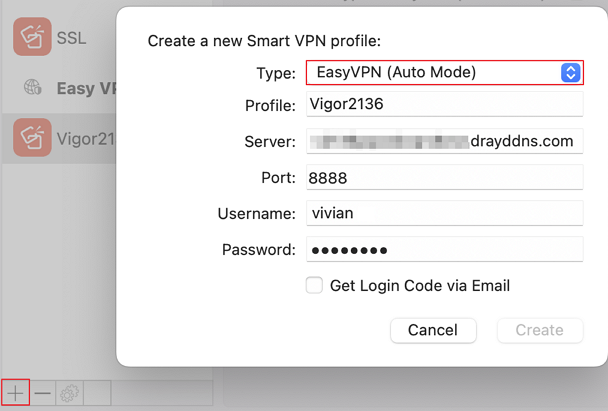
1. Run SmartVPN app and add a profile as follows:
• Select EasyVPN (Auto Mode) as Type
• Give it a Profile Name
• Enter the VPN server’s Domain Name, which applied with a valid certificate for HTTPS service.
• Enter the EasyVPN port configured on the VPN server
• Enter the Username and Password.
• Save the profile.
2. Tick Enable Profile to enable this profile, and click Connect to dial up the EasyVPN connection.
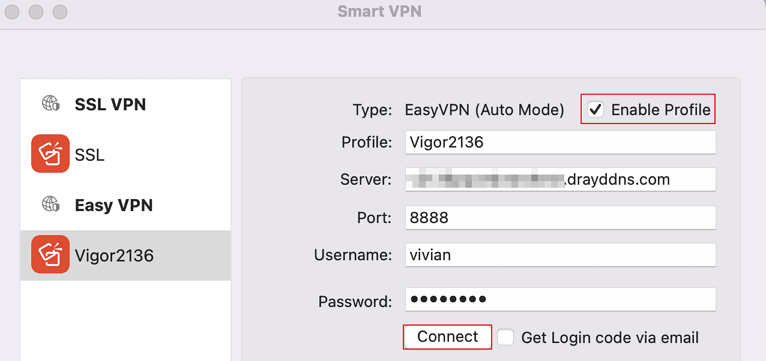
3. EasyVPN connection is successfully connected.